Nmap#
Nmap is a Scanning tool used for the enumeration stage of Pen Testing. It is very versatile and industry standard.
Common usages
Port Scanning
Service Enum
Running Nmap scripts for specific enum
Syntax#
The general syntax of a nmap scan is:
nmap [ip] [scan method] [MANY arguements] -vv
[ip] : The target server IP address
-iL can replace this, where you provide a txt file of hosts (one per line)
[scan method] : -s[something], there can be a number of arguements here
-sT TCP Connect scan
-sU UDP Connect Scan
-sS sneaky stealth scan. Better known as a TCP SYN scan
-sA is a ACK scan. This is more for understanding firewall rules.
-sN is a NULL scan, set all flags ‘0’
-sF is a FIN scan, and sets the FIN flag only
-sX is an XMAS scan, it sets FIN, PSH and URG. Shiny….
-sM is the Maimon scan, used against a particular OS (BSD, Berkley Software Distribution). It’s discontinued… but you never know.
-sW is a Window Scan, it reads the response of a RST flag.
-sV \t try to determine the service (and version)running behind the port. You can also add a –version-intensity [n 0-9] to decide how agressively to run this chec. This starts as a -sT
-sI is an idle (zombie) scan. It requires a very specific case
-sL \t List the targets that will be scanned, without scanning them. Commonly used with -n
-sn dont port scan (can be combined with -PR)
[scope] (this is optional, default is first 1000 ports at T3)
-p- scan all 65536 ports
p1-1337 scan ports 1-1337 inclusive
T0-5 The scan speed. 0 being the slowest and 5 being ‘insane’. 4 is good for CTF, 1 in ‘actual’
[arguements]
–script [Nmap script]
vuln [ip] Try determine known exploits
-n Dont resolve DNS
-O Try detect the OS of the target
-PR ARP request only (better be on the same subnet)
-PE Use ICMP Echo to discover hosts
-PP Use ICMP timestamp instead of echo, useful if echo is blocked
-PM Use ICMP address mask instead of echo, useful if echo is blocked
-PS Uses TCP SYN to discover hosts. Can add a port or range (without spaces), default is on Port80
-PA Uses TCP ACK to discover hosts (they should respond with a RST)
-PU Uses a UDP PING
-R Lookup DNS names for offline devices
-F Fast mode, only scan best 100, not 1000
-r Scan ports in order
-t
The speed of the scan (for IDS evassion). 3 is normal, 1 is SLOW and 5 is ‘insane’ -S For spoofing IP addresses
-D For creating Decoys
-f For fragmenting packets into 8bytes (or -ff for 16 bytes)
-sC Run default scripts (or –script=default)
-A An all (aggressive) scan. Is the same as “-sV -O -sC –traceroute”
-vv : VeryVerbose, stops you going crazy wondering if its working
Why so many scan options?#
Discovery#
These are the scan types for target discovery (is there something on this IP worth investigating).
-PR#
This arguement send a broadcast ARP request only. This is a great one to use as it’s not blocked by any firewalls (as it’s part of maintaining a network), but it requires you to be on the same subnet as your targets.
-PE -PP -PM#
These are ICMP Echo, Timestamp and Mask respectively. All run in the ICMP domain and are ways to work around a firewall. Echo tends to be blocked (and is by default most times). Timestamp and Mask requests are alternatives.
-PS -PA#
These are TCP discovery methods. -PS Uses a SYN request (on port 80 by default) and if it recieved back a response (SYNACK or RST) then treats the IP as active. It just waits for the response if run as priveliged user, or completes the handshake if not. -PA is an ACK message which will recieve a RST if the target is active (as its not part of an established message), and can only be run as priveliged user (otherwise it will run a SYN).
-Pn#
Dont discover, assume it is online
Port Connect#
Now that we know what targets to hit, we now have to decide how to confirm a port is open or closed. Because of annoying things like firewalls however, theres more to it. There are 6 possible states of a port scan. This is copied directly from TryHackMe’s nmap02 Room
Open: indicates that a service is listening on the specified port.
Closed: indicates that no service is listening on the specified port, although the port is accessible. By accessible, we mean that it is reachable and is not blocked by a firewall or other security appliances/programs.
Filtered: means that Nmap cannot determine if the port is open or closed because the port is not accessible. This state is usually due to a firewall preventing Nmap from reaching that port. Nmap’s packets may be blocked from reaching the port; alternatively, the responses are blocked from reaching Nmap’s host.
Unfiltered: means that Nmap cannot determine if the port is open or closed, although the port is accessible. This state is encountered when using an ACK scan -sA.
Open|Filtered: This means that Nmap cannot determine whether the port is open or filtered.
Closed|Filtered: This means that Nmap cannot decide whether a port is closed or filtered.
-sT#
The sT scan is a TCP connect scan. Simply, Nmap attempts a full TCP 3way Handshake for each scanned port (and then kill it with a RST ACK if it completes). This is the only scan that doesnt require a priveliged account.
-sS#
The Sneaky Stealth Scan, or more accurately, the SYN scan. This requires a priveliged user and is mroe sneaky as it doesnt complete a connection (so is less likely to be logged). It starts with the SYN, Recieves a SYNACK and then sends a RST to kill the handshake. As you can guess, this is only more stealthy, but could still be logged.
-sU#
The sU scan is a UDP scan, which sort of runs opposite to the TCP scans. As UDP is stateless, we would expect no response if the port is open (as UDP ‘packets’ dont have a session or give a response, they are fire and forget).
A closed port however should give a ICMP “Destination Unreachable” response. This still searches for a TCP port, not UDP.
-sN#
The NULL scan sets all the flag bits to zero. If a port is open, we would expect no response, but if it’s closed then we would recieve a RST. A firewall would also give no response, so Nmap treats this as Open | Filtered.
-sF#
The FIN scan sends only the FIN flag in a port connect. Similar to the null scan, it is looking for no response to indicate an open port. Once again this can only return Open | Filtered.
-sX#
The XMAS scan is named after the lights on a christmas tree, it sets the FIN, PSH and URG flags (All the special case flags). If you had a warning system in the TCP protocol, it would light up everything. As with a NULL and FIN scan, it’s looking for no response, and gives Open | Filtered.
-sM#
The Maimon scan is a special case, but we like them. This sends a FIN/ACK message. On most OS, this will return a RST if the port is open or closed, not so helpful. Some BSD (Berkely Software Distribution) OS’ drop the packet however if the port is open. The BSD OS isnt widely used, but there are some interesting ones on wikipedia, such as FreeNAS and the PS3.
-sA#
This is an ACK scan, and by itself an ACK scan doesnt show much. It sets the ACK flag and a host should return RST whether the port is open or closed. However if there is a firewall in between, it will drop the packet. Therefore this scan is used for understanding what is allowed through a firewall. This scan returns an Unfiltered state for ‘allowed’ ports.
-sW#
A window (not WINDOWS) scan is similar to an ACK scan, however it examines the RST reponse to try determine more information about the port (such as if it’s open).
Custom Scan#
You can also create a custom scan, –scanflags [flags to set]
for example: sudo nmap 127.0.0.1 –scanflags SYNACKURG
Naturally, you will need to understand how to interpret these results yourself however.
-sI#
This is the idle scan and is a scan method that is used when trying to evade detection. I requires a ‘zombie’ machine which is Idle on the network. What this means is that it is transmitting NO data during the scan time, other than what we trigger. There are a few steps to this scan, but it is basically a masked TCP Connect (-sT) scan.
Send a SYNACK to the idle machine, from this we get back the current packet number ID of the zombie.
Send a SYN packet to the target machine, with a spoofed IP of the zombie.
The target will then communicate with the zombie based on its port state.
Query the zombie again with a SYNACK, and compare the new packet number to the old one.
If the port was closed on the target, it would have sent a RST packet to the zombie, which doesnt increase its counter. When we query the zombie again, it would have only increased its counter by 1 (us sending the SYNACK a second time).
If the port was open on the target, it would have sent a SYNACK to the zombie, which wouldh have responded to the target with a RST and increased its own counter. Would would have seen the counter increase by 2 on our second SYNACK.
If a firewall was blocking the port, we would have the same response as a closed port.
Evasion#
Spoof IP -S#
Nmap supports spoofing the source IP of a packet scan, which sounds great but comes with a few requirements. First, you need to be able to listen to the responses to the Spoofed IP. Second, you will likely need to specify the network interface to use. If you want to spoof your MAC, this only makes sense if youre already on the subnet too.
nmap -e [Net Interface] –spoof-mac [spoofed MAC] -S [spoofed IP] [target IP]
Decoys -D#
Decoys are another way to hide the source of the traffic. You list a group of IPs to show where the traffic is coming from, and NMAP will run these in parallel. You can also use RND which will randomly create an IP.
nmap -D [fake IP1],[fake IP2],[real IP (ME)],[fake IP3]….many more
Fragmentation -f#
Fragmentation is a way to split up packets to make things more difficult for some firewalls, IDS and IPS. Adding a -f will split the packet into 8byte fragments and transmit these seperately. -ff will make it 16 bytes instead.
Zombie Scan (-sI)#
A zombie scan is a method that uses an “idle zombie” to communicate with the target, while spoofing your own IP to make the request appear to be coming from the idle host. More details are in the scan types above.
NSE (Nmap Scripting Engine)#
Nmap comes with a lot of built in scripts for extending functionality (almost 600 at the time of writing). These are in the nmap share by default (/usr/share/nmap/scripts) and are named starting with the service/protocol they target.
You can run a category of scripts with –script=[category]. The defaults ones are
auth (authenication related)
broadcast (host discovery)
brute (bruteforce password auditing… whatever that means)
default (run the default scripts, also -sC)
discovery (peforms some enumeration, such as DB tables and DNS)
dos (detect if vulnerable to DoS)
exploit (attempt to exploit services with known exploits)
external (uses 3rd party services… I should look into this)
fuzzer (runs fuzzing attacks)
intrusive (runs agressing scripts like bruteforce and exploit)
malware (scan for back doors… I like this)
safe (safe to use on targets without crashing them?)
version (more version detection)
vuln (detect vulnerable services)
If you want to run a single script, the format is slightly different
nmap [ip] –script “script name.nse” -vv
Useful Scripts#
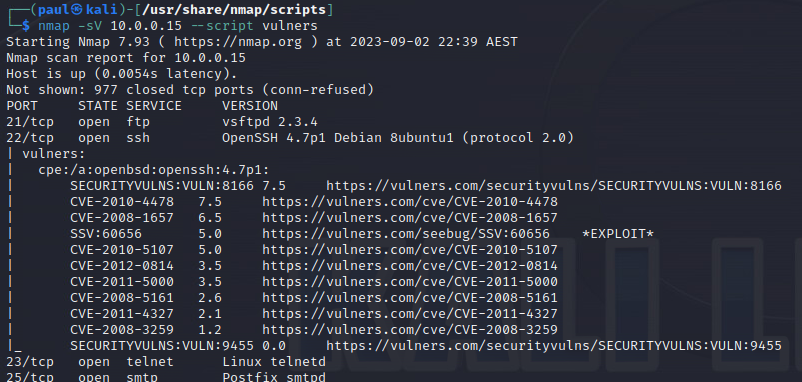
Nmap-vulners#
When running a -sV scan (version) detection, this takes the next step of matching the services against known vulnerabilities in those services.
Installation#
You need to clone the github repo directly to the nmap scripts folder
cd /usr/share/nmap/scripts
sudo git clone vulnersCom/nmap-vulners.git
Running#
As above, this is an extension to the version detection scan. You need to drop the “nmap-” in the name too
nmap -sV [target] –script vulners
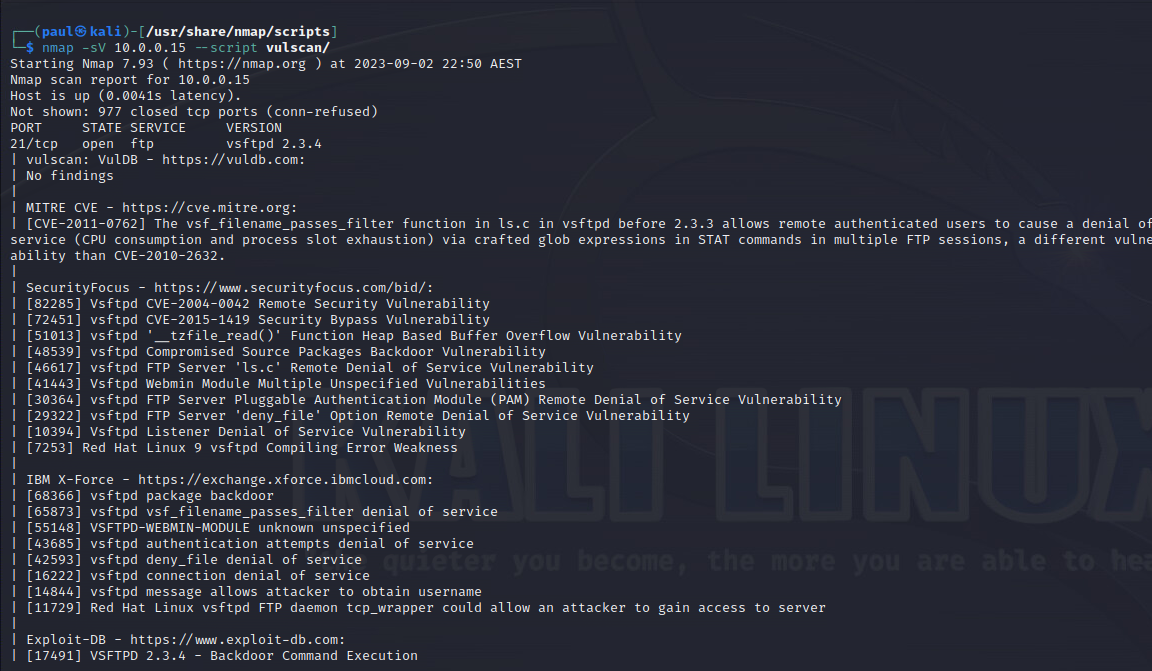
Vulscan#
Similar to Nmap-vulners, vulscan takes the output from an -sV scan and extends it to vulnerability databases. It uses cve, osvdb, scipvuldb, secuiritytracker, exploitdb, openVAS, securityfocus & xforce (at time of writing). These can be seen as .csv files in the scripts/vulscan folder.
Installation#
You need to clone the github repo directly to the nmap scripts folder
cd /usr/share/nmap/scripts
sudo git clone scipag/vulscan.git
Running#
Again, similar to Nmap-vulners. We need to pass the folder so it grabs the nse file (thanks Google).
nmap -sV [target] –script vulscan/
As you can see, there is quite a bit of repetition, if you want to only run for a single db
nmap -sV [target] –script vulscan/ –script-args vulscandb=exploitdb.csv
Logging#
When it gets messy, logs are a great thing to have. Theres a few modes for Nmap logging.
-oN Normal
-oG Grepable
-oX XML
-oA All of the above (separate files)
-oS Script kiddie
We dont to that here
Examples#
Scan a target
nmap 10.0.0.1
Scan a range of targets
nmap 10.0.0.1-255
nmap 10.0.0.0/24
Scan a range of targets with one port
nmap 10.0.0.0/24 -p 22
Scan a range of targets with one protocol
nmap 10.0.0.0/24 -p http,https,ssh
Scan a range of targets with multiple ports
nmap 10.0.0.0/24 -p 1-1024
Scan a range of targets with some on TCP and others on UDP
nmap 10.0.0.0/24 -p U:53,T:21-25,80,443